USER MANUAL
SARTHAK
Human Resource Management System
for
Govt. of Madhya Pradesh
Madhya Pradesh Agency for Promotion of Information and Technology (MAP_IT)
State IT Center, 47-A, Arera Hills, Bhopal, M.P. - 462011, Phone: +91-755-2518300, Fax: +91-755-
2579824
SARTHAK MOBILE USER MANUAL
Table of Contents
1.
Overview:
3
2.
Application Download
3
3.
Login
3
4.
Mark office location
4
5.
Mark Attendance:
4
6.
My profile:
5
7.
Activities:
6
8.
Tour:
6
9.
Report
7
10.
My team
8
11.
Holidays:
8
12.
Change Password
9
13.
My Attendance
9
14.
Assigned Activities
10
15.
Sarthak (Biometric)
10
LIST OF FIGURES
Figure 1 - Sarthak App
3
Figure 2 - Login Acreen
3
Figure 3 - Mark office location
4
Figure 4 - Mark Attendance
5
Figure 5 - My Profile
5
Figure 6 - Activites
6
Figure 7 - Tour
7
Figure 8 - Report Formats
7
Figure 9 - My team
8
Figure 10 - Holiday windows
8
Figure 11 - Change Password
9
Figure 12 - My Attendance
9
Figure 13 -Biometric windows
10
2 | P a g e
SARTHAK MOBILE USER MANUAL
1. Overview:
Human Resource Management System has become an important factor. This system should help the
department to streamline the administrative task and provide the data for resource planning and
management. Building this system in mobile-based as well as the web-based interface will further
help ease of accessibility from anywhere. This system will include two types of module; Mobile
based and web-based module.
This user manual is designed to assist with the basic operation of SARTHAK mobile application and to
help you understand some of the commonly used features and functions.
2. Application Download
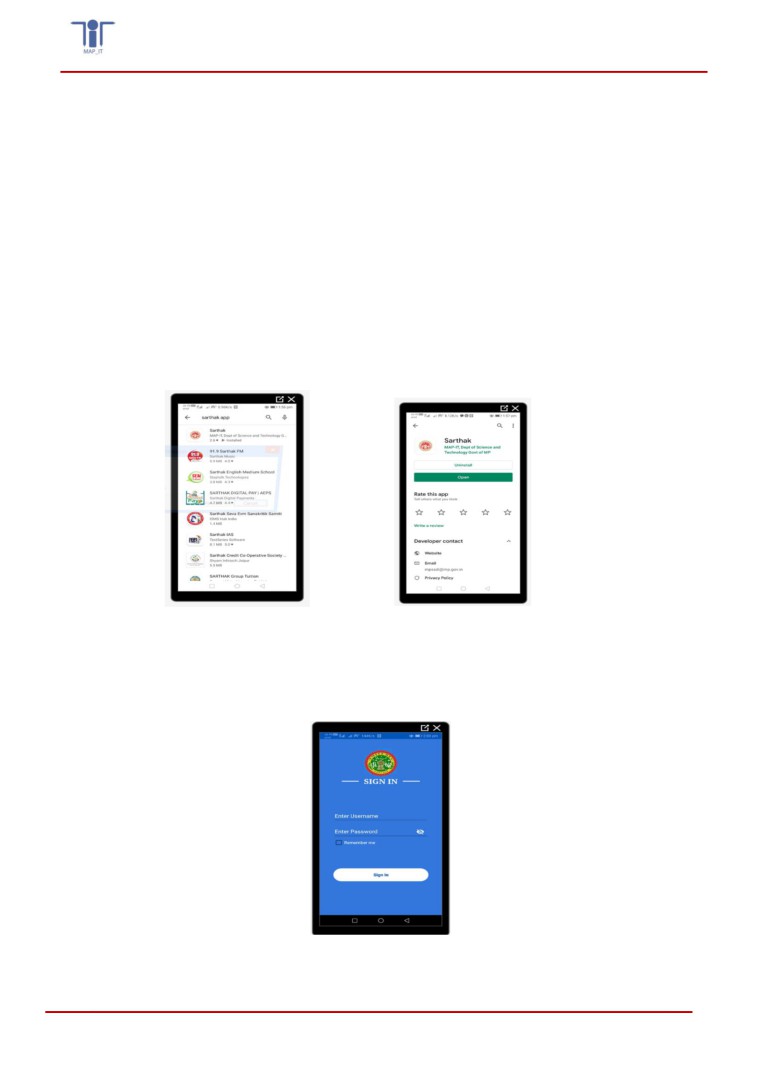
To download the application, user need to go on paly store. In play store user will type Sarthak app.
A list will come. On this list user need to select SARTHAK app with Madhya Pradesh logo. Once user
will select Sarthak app, it will ask to install. User will give permission to install and system will install
this app after downloading.
Figure 1 - Sarthak App
3. Login
After installation, user will open this application, login screen will open, where user will enter
provide user id and password to login in the application.
Figure 2 - Login Acreen
3 | P a g e
SARTHAK MOBILE USER MANUAL
4. Mark office location
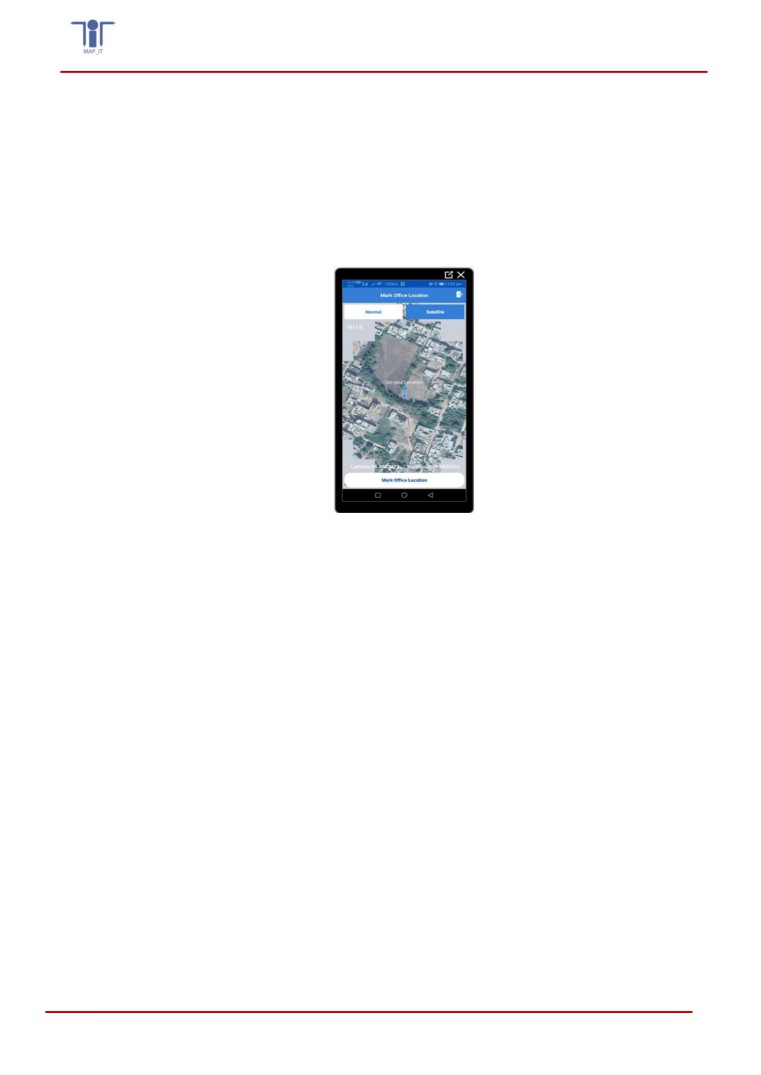
After login, user will mark their office location
To mark the location, user need select either normal or satellite for viewing office location
After opening of office location, user will click at the top of their office
User will click on “Mark Office Location” tab at the bottom of the screen
Office location will registered in the system
Figure 3 - Mark office location
5. Mark Attendance:
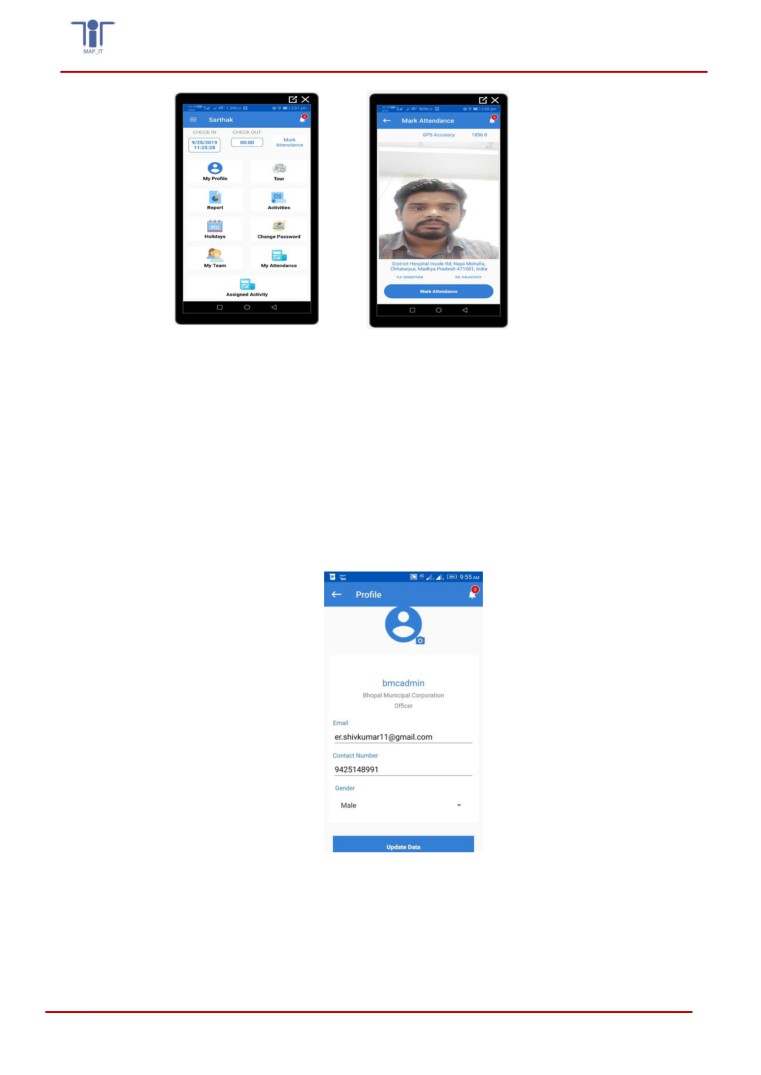
After marking of office location, a new screen will open. On the top of the screen mobile
user should be able to view the button named as ‘Mark ttendance’.
Selecting the button should open the camera as well as the location of the user on the map.
User should be able to click geo tagged photo and store the data with respect to current
date and time.
On top of the window system should show current GPS accuracy
User will click on “Mark Attendance” tab to mark the attendance
This attendance is geofencing based, to mark the attendance user need to come under
100m range
User should be able to both check in and check out
First picture will be save as profile picture and capture office location for Geofencing.
User need to click on “Check out” tab to enter their check out time
4 | P a g e
SARTHAK MOBILE USER MANUAL
Figure 4 - Mark Attendance
6. My profile:
To visualize and update the profile information, user will click on “My Profile” tab
Profile information should have following fields;
o Email
o Contact Number
o Gender
User will be able to update the profile information
To update the date user need to update information and click on “Update Data”. The profile
information will be updated
Figure 5 - My Profile
5 | P a g e
SARTHAK MOBILE USER MANUAL
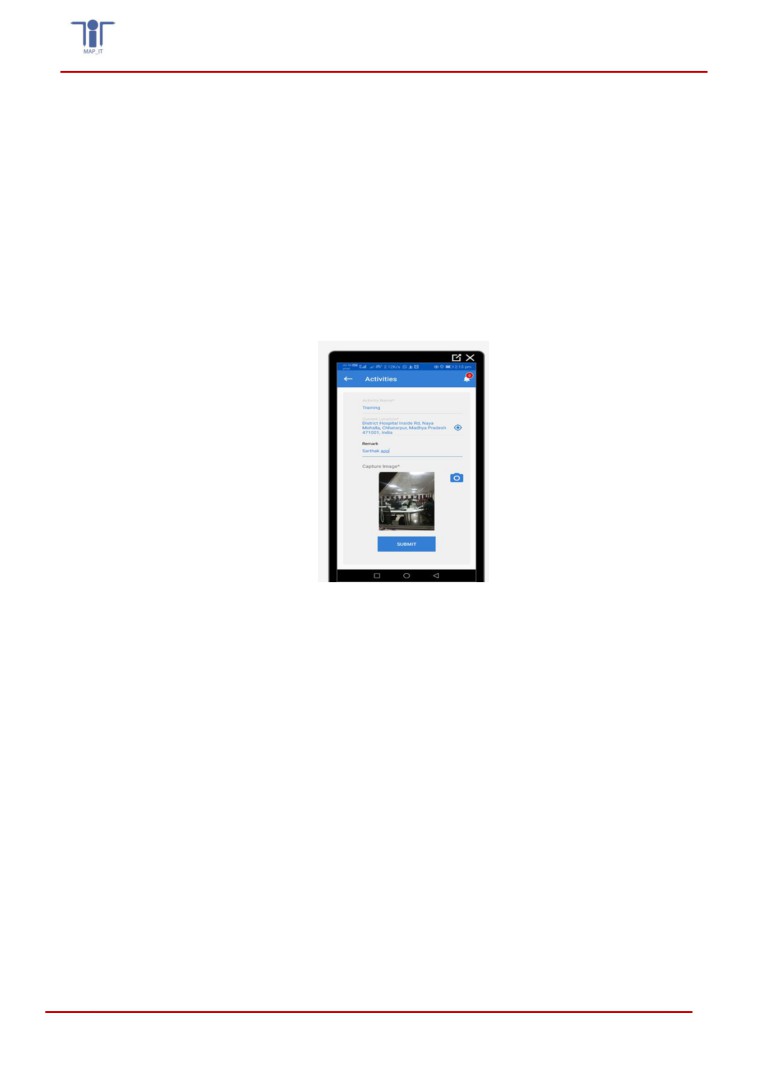
7. Activities:
User will be able to mark their daily work activities along with photo in this functionality
To add new activity user should click on ‘Activities’ tab,
Selecting shall open a form where information should be filled by user,
o Activity Name
o Current Location
o Remarks
o Capture Image*
User should enter all the details and click capture photo icon,
User should click the activities photo
After clicking options will be activated to save or cancel the photo
Once user save the photo, then activity submission button “Submit” will be activated.
User need to click on “Submit” button to save the activities
Figure 6 - Activites
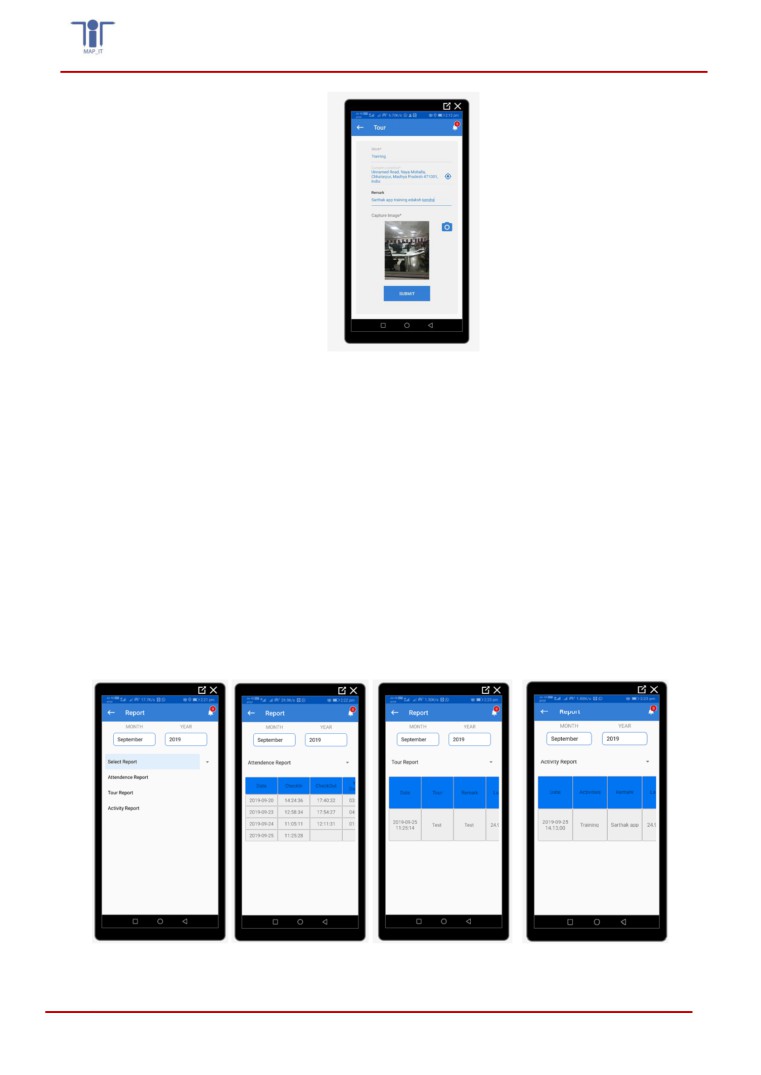
8. Tour:
User should be able to mark their tour activities along with photo in this functionality
To add new tour activity user should select ‘Tour’ tab
Selecting shall open a form where information should be filled by user,
o Work
o Current Location
o Remarks
o Capture Image*
User should enter all the details and click the capture photo icon,
User should capture tour activities photo
After clicking options will be activated to save or cancel the photo
Once user save the photo, then activity submission button “Submit” will be activated.
User need to click on “Submit” button to save the activities
6 | P a g e
SARTHAK MOBILE USER MANUAL
Figure 7 - Tour
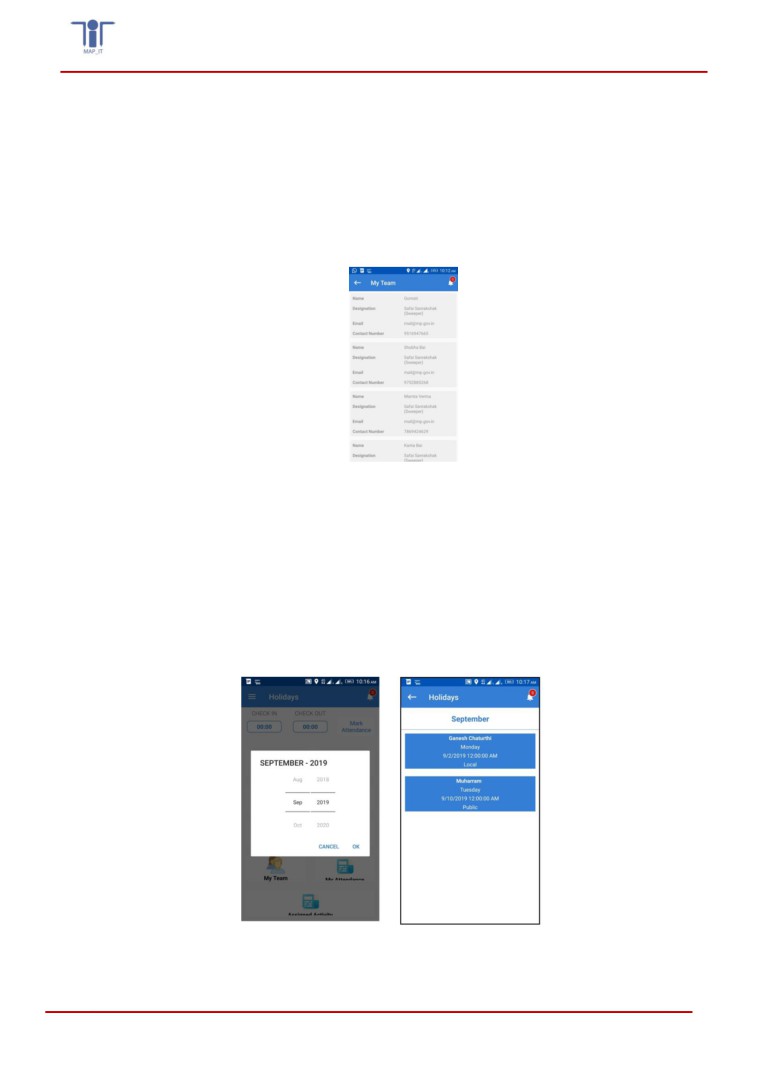
9. Report
User should be able to view their attendance, tour and activities report
To see report user should select ‘Report’, tab
Selecting will open a form where user will select,
o Month (Drop down)
o Year (Drop down)
o Select Report (Drop down)
User should select type of report from drop down fields
User should be able to visualize all the reports with respect to the date in this functionality,
User should be able to track reports of past days by selecting the date from the calendar.
Selecting the date should give the user to see reports as mentioned below:
Attendance report (in and out attendance timing details date wise)
Tour report (tour, remarks, latitude, longitude and photo details date wise)
Activity report (tour, remarks, latitude, longitude and photo details date
wise)
Figure 8 - Report Formats
7 | P a g e
SARTHAK MOBILE USER MANUAL
10.
My team
User should be able to view their team list
To view the team list user will click on “My Team” tab
List of team will open
List of team members should contains following fields;
o Name
o Designation
o Email ID
o Contact No.
Figure 9 - My team
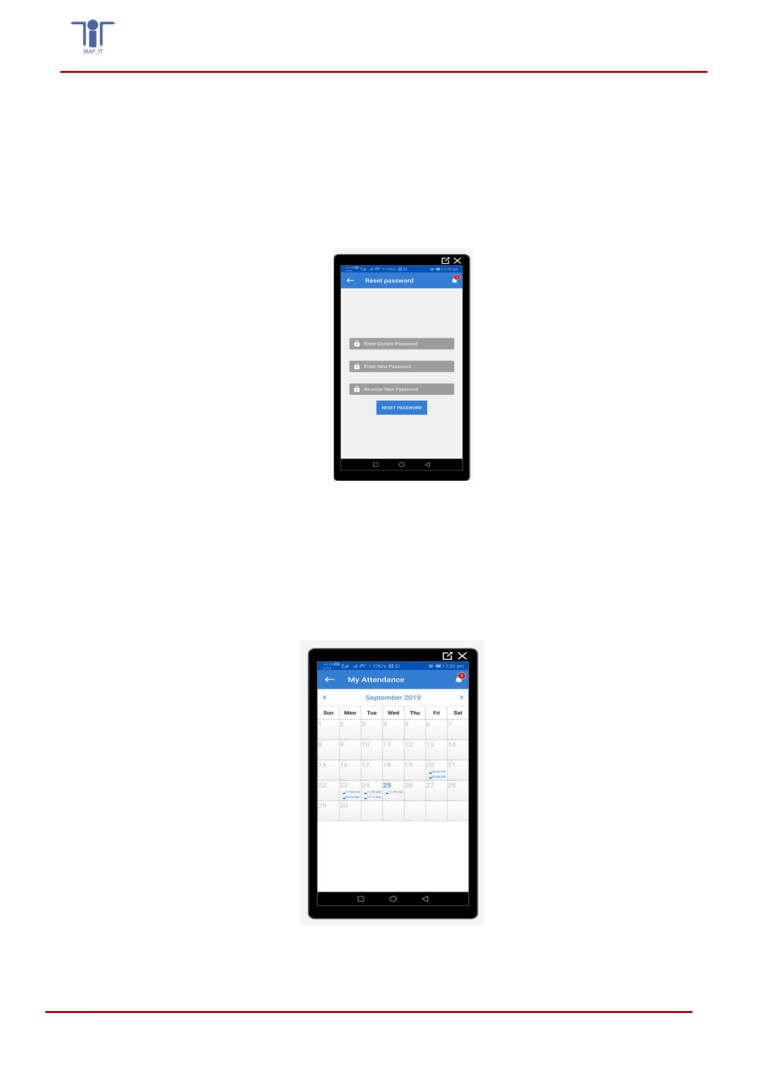
11.
Holidays:
User should be able to see month wise government approved holidays in this functionality
To see holidays user should select ‘Holidays’,
Selecting shall open a window where user will select desired month and year,
After selection user will click “Ok”
User should be able to visualize the list of all the government holidays of the selected month
as per the calendar.
List should mentioned Name of festival and local / Public holiday
Figure 10 - Holiday windows
8 | P a g e
SARTHAK MOBILE USER MANUAL
12.
Change Password
User should be able to change the password in this functionality
To change password user will select ‘Change Password’ tab,
Selecting shall open a window where user need to enter following details;
o Enter Current Password
o Enter New Password
o Re-enter New Password
fter entering the details, user need to click on “Reset Password”
Figure 11 - Change Password
13.
My Attendance
User should be able to visualize the attendance in this functionality
To visualize the attendance user will select ‘My ttendance’ tab
Selecting shall open a window where user will visualize current month date wise daily check-
in and check-out time details
User will be able to change the month to see attendance of another month
Figure 12 - My Attendance
9 | P a g e
SARTHAK MOBILE USER MANUAL
14.
Assigned Activities
User should be able to visualize the assigned activities
To visualize the attendance user should select ‘ ssigned ctivity’
Selecting shall open a window where user will visualize month wise assigned activities.
15.
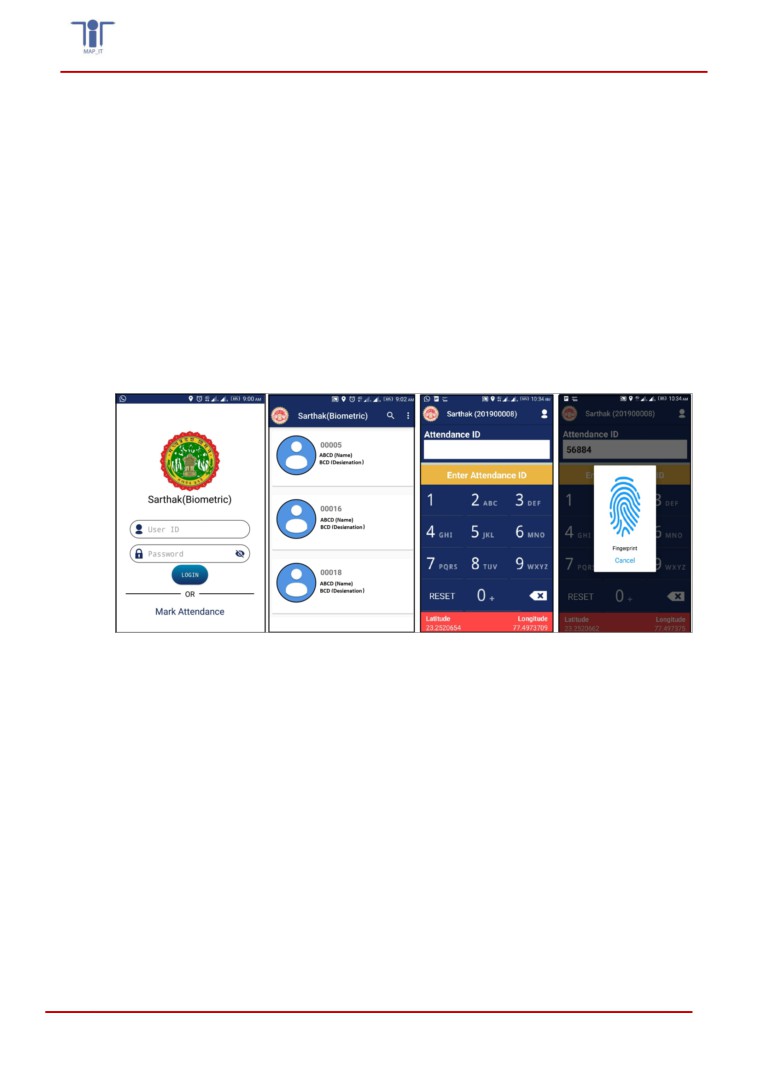
Sarthak (Biometric)
To use this functionality user will use separate app “ SARTHAK BIOMETRIC”
User should be able to mark daily check-in and check-out through biometric device
User will need to connect biometric device with their mobile
Module should show list of registered employees with their Name and designation
By clicking of employee name, system should show their daily check-in and check-out status
User will enter Attendance ID (Employee ID)
After entering system will ask to put finger on biometric machine
User will put any finger on biometric machine
After verification through biometric machine, employee attendance will marked
Figure 13 -Biometric windows
10 | P a g e
